Movement
Units move when given an order or by using initiative in the Command & Initative phase as explained in the Command & Initiative section. Units can also move in the Shooting or Combat phases as explained in the corresponding rules sections. This section covers all the general movement rules for units including rules for various types of terrain. Rules for moving characters can be found under the Generals, Heroes and Wizards section.
Movement distances
The maximum distance a unit can move depends upon its troop type and formation. Some troops are naturally faster than others – cavalry are faster than infantry, for example. Troops arranged in a regular Formation are able to move more quickly than units in an irregular formation.
Broadly speaking, infantry units and monsters move up to 20cm at a time, cavalry and chariots move 30cm and artillery, such as stone throwers and cannons, move 10cm. Flying troops can move up to 100cm but their movement is governed by special rules, as described later. The chart below gives the full pace move distances for each troop type plus the half pace movement. In each case, distances are maximums and the player can move the unit a shorter distance if he wishes.
Formation
Each unit must be arranged in formation. By this we mean that all the stands in the unit are placed in touch so they form a line, column or irregular formation, as described below.
Units charging or evading can move up to full pace regardless of their formation. Charge and evade moves are described later in this section.
All units wholly or partially in a fortified position at the start of their movement can only move at half pace regardless of their formation unless they are charging or evading, in which case they move at full pace as noted above. See Shooting and Combat for more about defended and fortified units.
Units arranged in a column with stands placed one behind the other (as shown in picture below), either edge-to-edge or corner-to-corner, can move at full pace unless in a fortified position as noted above. Units in a column are said to be in a regular formation.
Units arranged in a straight line with all their stands facing in the same direction and butted edge-to-edge move at full pace unless in a fortified position, as noted earlier. Units in a line are said to be in a regular formation.
All units in other formations or circumstances move at half pace. For example, infantry are able to move up to 10cm, cavalry up to 15cm and so on. This represents the fact that the unit is out of regular formation and that it is necessary to regroup in order to move. For convenience, we refer to all these formations as irregular. Note that the only situation where an irregular formation moves at full pace is when it charges or evades.
In some circumstances, units move a distance determined by rolling dice or by the results of combat (such as drive backs, retreat moves and advances). These distances are not affected by the unit’s formation.
The move
When moving a unit, move each stand one at a time. Experienced players usually find it convenient and quicker to move whole units at once but in principle, stands always move one at a time to ensure a path can be traced.
Select one stand from the unit and move it. Then move the second stand into formation with it. Then move the third to complete the formation (assuming a unit of three stands). Note there is no need for the unit to retain its original formation – the stands are simply re-arranged as needed when the unit moves.
All stands must be able to trace a clear path to their position in the unit’s final formation. Stands do not have to move to their front – they can move backwards, to the side, at an angle or in any orientation or direction.
No part of a stand can move further than its permitted maximum movement distance. Always measure from the part of the stand that moves the greatest distance – this will often be one of the corners.
A stand cannot move through the base area of a stand from another unit whether friend or foe either wholly or in part. A stand can move through other stands of the same unit if they have not yet moved and are not engaged in combat. This allows stands to move out of their own unit’s formation without jamming each other. A stand cannot move through other stands who have already moved or are engaged in combat, even where they belong to the same unit.
Stands can move through terrain appropriate to their type as noted below. Stands cannot move through terrain if it is impenetrable to their type. See the section on Terrain.
There is an exception to the rule that prevents stands moving through other units – this happens when a unit bursts through another during an evade and is described later.
Stands can always move through characters as described in the Generals, Heroes and Wizards section.
|
The Q&A has a section on Movement with further examples, including pivoting |
Moving through gaps
When a stand moves, it can be oriented to pass through any gap so long as the gap is at least as wide as the stand’s shortest edge, usually this will be 20mm. For example, an infantry stand might be turned to its side to move through a gap between impassable walls and a river.
Except as noted later, a stand cannot pass through a gap between any of the following unless the gap is wider than the stand’s frontage: two enemy stands, an enemy stand and a friendly stand, or an enemy stand and impassable terrain. This means that the gaps must be more than 40mm for infantry and more than 20mm for cavalry. See Figure 5 and Figure 6.
This rule prevents units moving through gaps whilst close to enemy units and where there is little room for effective manoeuvring. Note that although stands are not permitted to pass between enemy stands as described, this does not prevent them moving between such stands to charge them, assuming there is room to do so (See The Charge).
Terrain
→ Moved to Terrain at the end of this chapter.
Moving by initiative
→ Moved to Command, Initiative movement.
The evade
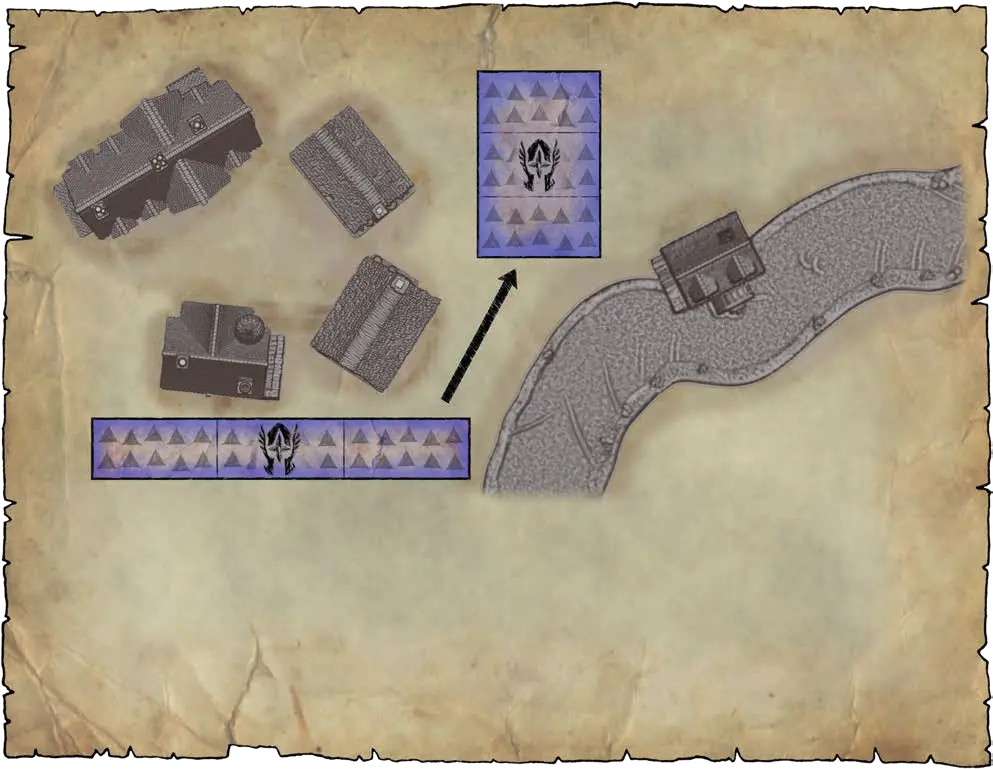
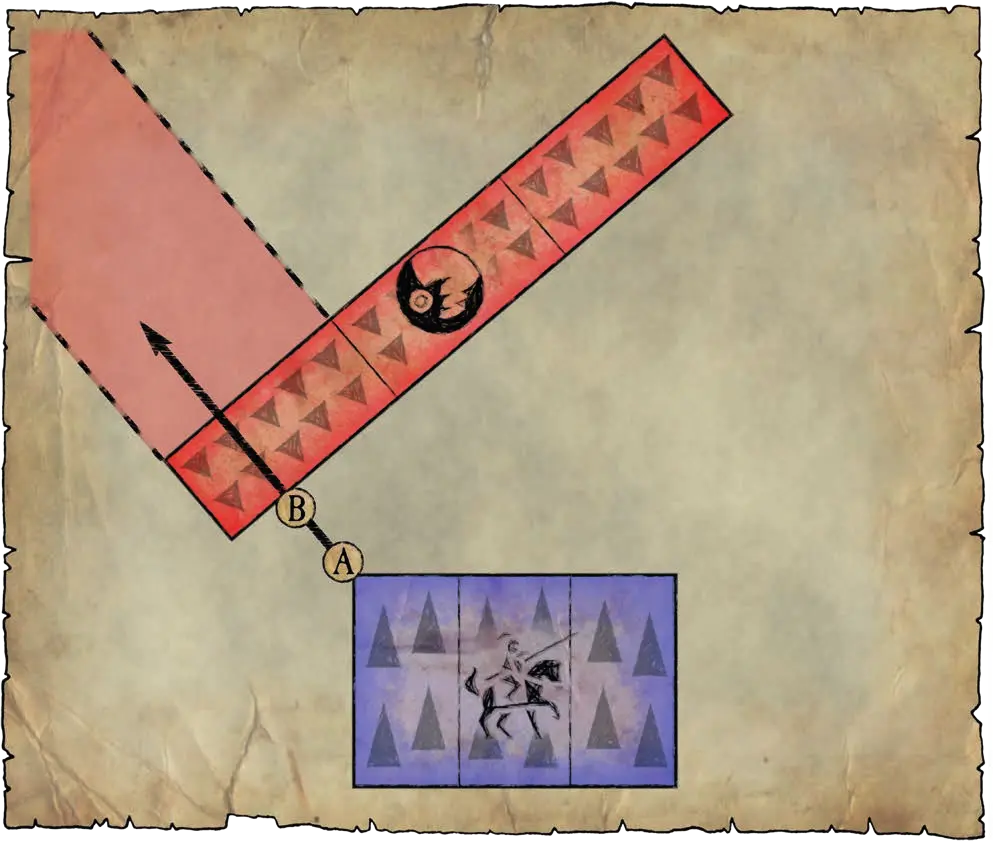
An evade is a deliberate attempt to avoid an enemy by using initiative to move away. Evading units always move directly away from the closest enemy they can see.
Evading units can move up to a full pace move regardless of their formation. They can move less if they want.
When we say ‘directly away’ or, for that matter, ‘directly towards’, the direction is established by placing a tape measure between the closest points of the closest two opposing stands. Where stands are equally close, the evading player may choose between them. The resulting line indicates the exact direction in which the evaders move. See Figure 7.
Move the evading stand that is closest to the enemy first. This stand must move in a straight line in the indicated direction directly away from the evaded enemy. The stand can be oriented to face any direction during its move allowing the evaders to move through gaps, turn to face their enemy, or change the stand’s final facing. Move the rest of the stands one stand at a time and arrange them into the unit’s new formation. Remember to take into account any necessary distance required to reorient stands as they move.
Evading units cannot move through terrain they could not normally enter, nor through enemy units or combat engagements. An evading unit must end its move at least 5cm from any enemy unit or any unit engaged in combat. If unable to comply, units cannot evade.
An evading unit can move through a friendly unengaged unit if the player wishes assuming the evaders have sufficient move to pass completely through. This is called a burst through and is an exception to the normal rule that units can’t move through each other. The burst through represents a situation where trained troops in good order manoeuvre through each other, one unit opening up its ranks to allow the other to pass. See Figure 8. This obviously takes time, so a unit which is burst through is automatically confused! See the Confusion section.

Mouvement des personnages
→ Moved to Command, Character movement.
The charge
The rules for moving chargers may look a bit intimidating at first but do not worry! Almost all moves happen in an obvious way. Many of the following rules are intended to overcome any unusual circumstances you might come across where care may be needed.
Sequence of charges
The term ‘charge’ describes a unit’s movement into contact with an enemy unit during the Command & Initiative phase whether by initiative or by means of an order. Units which move by initiative are moved before units which move by orders but, apart from this, there is no obligation to move charging units in any particular order. Charges occur throughout the Command & Initiative phase as units move against enemy units.
Where a charge is intended, the player must say so before any stands are moved as this alerts both players to the need for care. A unit is not obliged to charge just because the player has stated it – the move may prove impossible or player might simply change his mind for any reason.
During a charge, each stand can move up to its full pace distance regardless of the unit’s formation at the start of the move.
Enemy in sight
At least one stand from the charging unit must be able to see the target enemy unit at the start of the unit’s charge move. If none of a unit’s stands can see the intended target then it cannot charge it. See the section on Visibility on the battlefield. Note that because units move one after the other it is possible for one unit’s move to clear or block the line of sight for another; it is therefore important to take care when deciding which units to move and in what sequence.
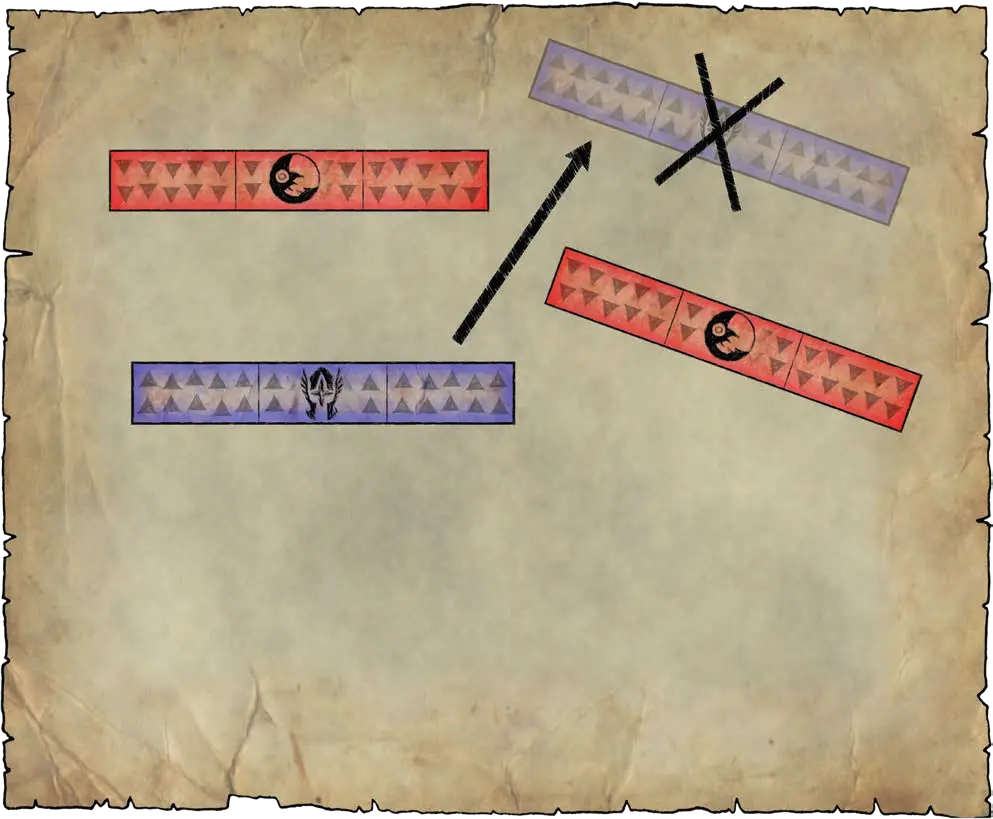
Front, flank and rear
The charging unit can potentially contact against the front, side or rear of an enemy — this is an important distinction because stands suffer a penalty if enemy are fighting to their side or rear as described in the Combat section.
For the purpose of working out where to position units during a charge, the area around each stand is divided into four zones as shown on Figure 9 and Figure 10. The division between each zone bisects the corners of the stand at the angle of 135 degrees relative to the edge. Zones are self evident in most situations and can be checked using a simple guide if necessary.


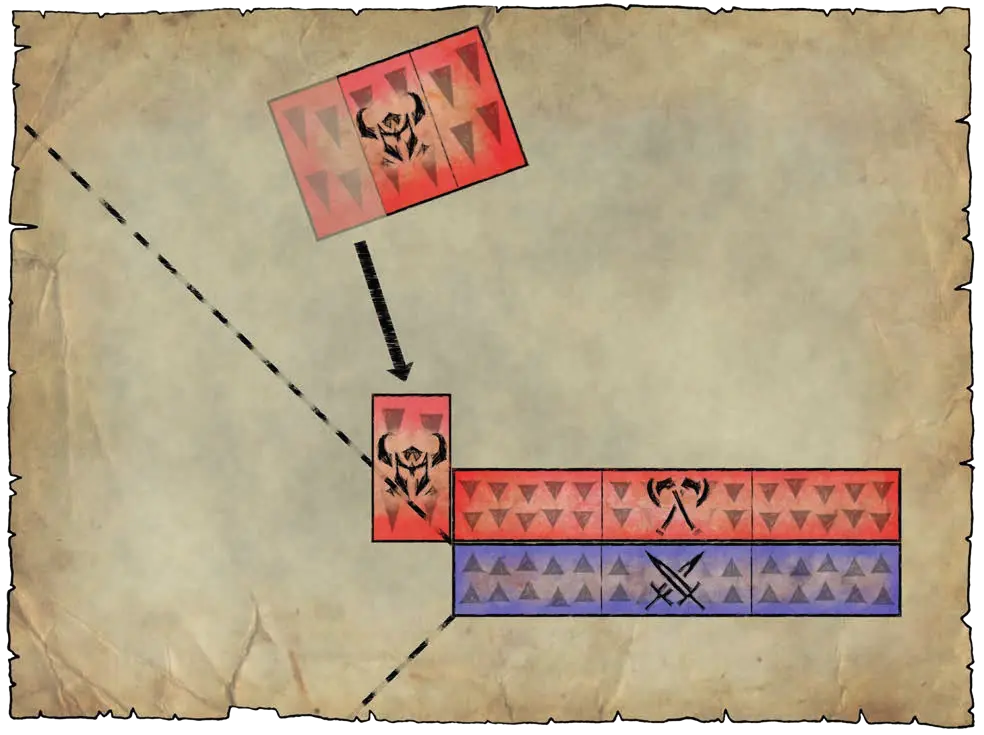
Once a unit’s intention to charge has been declared, begin by considering the position of the entire charging unit relative to the closest visible stand in the target unit. If the charging unit begins its move in the stand’s front zone then it charges to the front, if it begins to the stand’s flank it charges in the side, and if it begins to the rear it charges in the rear. See Figure 11.
If the charging unit is not entirely within a single zone then it counts as being in the zone that it mostly occupies. So, if a unit is between the front and flank but the greater proportion is to the front, the unit counts as in the front. If a unit is positioned in such a way that it is exactly divided between two zones then roll a dice to decide – e.g. 1, 2, or 3 the front; 4, 5, or 6 the side. See Figure 12.
The charge move
In most situations it is a simple matter to position the charging unit against the indicated front, side, or rear edge of the enemy unit. In some cases extra care is called for. Players who are unfamiliar with the game should make a point of moving the stands one at a time, as described below, until they are used to the placement rules.
To begin, the charging player selects one stand from the charging unit. Any stand may be chosen – it does not have to be the closest. This stand must be able to see the enemy and must have a clear path to the target.
The selected charging stand is moved into place against the enemy stand that has already been identified as the closest visible stand to the charging unit.
Move the charging stand so that its front edge contacts the appropriate edge of the enemy stand. If the unit is charging from the front zone, place the charger against the enemy stand’s front edge. If it is charging from the flank, place the charger against the side. If from the rear, place the charger against the rear edge.


If possible, place the charging stand exactly centre-to-centre against the edge of the target stand – see Figure 13. If this is impossible, for whatever reason, see Unable to contact centre-to-centre.

Forming a battle line
Once the first charging stand has been positioned, the remaining stands are placed one at a time to make a line formation or ‘battle line’. Each stand must be able to trace a line to its new position as it moves. Note that it doesn’t matter what formation the unit is in when it begins its charge, charging units always form a battle line if they can do so – if they are unable to do so then see Unable to form a battle line below.
To form the battle line, place the second stand beside the first, and place the third stand beside either the first or second. You cannot leave a gap in the battle line and then fill it later. The reason for breaking down movement by individual stands is to make sure each stand has an accessible route to its final place in the battle line.

Each stand must be placed in the battle line in such a way that as much of its front edge as possible makes contact with the enemy. This is called ‘maximising frontage’. If it is impossible to place a stand into the battle line so that its front edge makes contact with an enemy, then it must be placed so that its front corner touches an enemy if it can. This means that the maximum number of charging stands will be drawn into the combat.
Contact with other enemy
If there are other enemy units adjacent to the target unit then the obligation to ‘maximise frontage’ extends to these other units too. So, where there is another enemy stand aligned to the target unit, a charging stand must be placed against this second enemy if this is its only way to maximise frontage. However, chargers will always maximise frontage against the unit they originally charged where they can do so.
Any additional units contacted by charging stands count as being charged and are drawn into the combat engagement – even if they are only touching corner-to-corner. If armed with appropriate weapons they can shoot at the chargers as described in the Shooting section.

Supporting charges
During the Command phase, an infantry unit is allowed to make a supporting charge if it is positioned behind another infantry unit so that at least one stand could theoretically support in combat from the rear. (See Supporting troops in the Combat section.)
If the front unit charges, whether on initiative or by means of an order, then the second unit can automatically make a supporting charge. It can do so whether the first unit charges on initiative or with an order, even where the second unit was not included in a brigade order.
Note that the second unit might have more or fewer stands than the charging unit, or it could have some stands positioned to give rear support and some not. Regardless of how stands are positioned, only one unit can make a supporting charge on behalf of another. It is not possible to place two units so that they can both make supporting charges – in such a situation, the player must choose which unit will make the supporting charge.
The supporting charge is a normal move, except the unit making the supporting charge must be placed so that it touches the first unit and at least one stand supports it either from the rear or side. No stands can be placed into contact with enemies – neither into edge contact nor corner-to-corner contact.
The supporting charge is a special kind of combined move – the supporting unit’s move is rolled into that of the charging unit and is considered part of it. The charger can be thought of as carrying the supporting charger with the same order. If a unit is unable to move for whatever reason (if it is confused for example), or if it does not have sufficient move distance to move (if it is in irregular formation for example) then it cannot make a supporting charge. Also note, that after failing to receive its first order a unit cannot use its half pace move to join combat by moving into the supporting position.

Exceptions & anomalies
In some situations the proximity of scenery or other stands makes it impossible to position all the chargers exactly as described. In some cases this may mean the charge is not permitted, in others that chargers can be repositioned to accommodate the situation. These circumstances are covered in the following rules sections.
Unable to contact centre-to-centre
The first charging stand is always positioned centre-to-centre with the closest enemy stand where possible. If this is not possible then the first charging stand is positioned as closely to centre-to-centre as it can go, but there must be at least 1 full centimetre of exposed stand edge to contact against.
If there is less than 1 cm of exposed edge then the stand is not an eligible target because it is ‘blocked’. See below for how to deal with blocked stands.

Unable to form a battle line
If a stand has insufficient room or insufficient move distance to form a straight battle line, it must be placed either directly behind, or beside and staggered back from a stand that has already moved. Stands placed behind must be positioned facing the same direction as the stand in front of them. Stands that are staggered back can be placed with as much or as little of their stands touching as the player wishes, but must contact with a fellow stand at least corner to corner. Either way the unit must retain a coherent formation with all stands touching. If a unit is unable to both charge and retain a coherent formation then the move is not allowed. See Figure 14.
Any additional enemy units contacted as a result of the placement of these stands also count as being charged and are drawn into the combat engagement – even if chargers are only touching at their side or rear edge. If armed with appropriate shooting weapons they are entitled to shoot at the charging unit as described in the Shooting section.

Blocked edges
In some situations a charging unit will be unable to charge because, although it can see the enemy unit, the indicated edge of the closest stand is blocked. The indicated edge could conceivably be blocked by impassable terrain, by other enemy stands, or by stands from other friendly units that have already engaged the enemy unit in combat. Remember, an edge is blocked not only if it is completely covered, but also if there is less than 1cm of exposed edge available to contact.
In all these situations the charger moves the charging stand against the next closest stand in the target unit, assuming this stand is an accessible visible stand within the same zone. If this stand edge is also blocked then the charger can move to the third closest stand, and so on.

If no accessible edge is presented by any stand in the target unit then the charge is not normally allowed – for example, if there is impassable terrain covering the unit’s front edge and the charger is positioned in the target’s front zone. The exception to this is a ‘pinned’ enemy unit as described below.
Pinned targets
If the indicated edge of the entire enemy target unit has already been covered by stands from other friendly units then the unit is described as pinned.
In the case of a pinned target, the first charging unit can move into corner-to-corner contact with the closest enemy stand assuming the charger can see it and has a clear path. This is an exception to the normal rule that stands must charge edge-to-edge. See Figure 15.
Irregular formations
If the target unit is in irregular formation then it might not be possible for all the charging stands to engage by forming a conventional battle line. In this case the first charging stand is placed in the standard way as already described. It is only the remaining chargers that are placed differently.
Remaining charging stands are placed in a line but staggered to the front or rear so that they follow the shape of the stands presented by the enemy unit.
Although these charging stands might touch the enemy only at a corner or along part of their front edge, they are considered to be maximising frontage so long as they have the maximum portion of enemy stand directly to their front.

Enveloping charge
The ‘envelop’ rule applies when a unit is charged in the side or rear – it represents a unit’s inability to turn enough troops quickly enough to avoid being enveloped by an enemy charge. The reason for this rule is to avoid situations where it is otherwise disadvantageous to charge a unit in the side because only a single stand can touch.
When a unit charges an enemy unit from the flank or rear and contacts only against the side or rear of an enemy stand or stands, then any charging stands that would not otherwise touch the enemy when forming a battle line are allowed to make a further move into contact with the charged enemy unit as described for a pursuit. Stands must have sufficient move distance remaining from their charge move to make the envelopment move.
This is called an ‘enveloping charge’ and it is entirely up to the charger whether to envelop or form a conventional battle line. Each stand enveloping in this way must move so that its front edge contacts the charged enemy unit, otherwise these stands can be positioned as the player wishes so long as they remain in formation. Enveloping stands can contact other enemy units and therefore bring them into the combat, but they must also contact the charged unit either to their front edge or front corner as described. Note that this is comparable to a normal pursuit move in most respects – the enveloping charge effectively combines a charge and pursuit into a single move.
If chargers are infantry with supporting chargers then move both the charging and supporting units and work out any shooting first. Supporting units remain in their battle line and do not envelope.

Units which move off the table
Sometimes units or characters are obliged to move off the table. This can happen when a unit receives a ‘blundered’ order but can also happen to units that are defeated in combat or troops driven back by missile fire or magic.
If one or more stands in a unit leaves the table edge, whether wholly or partially the whole unit leaves the table. Units that leave the table as a result of retreating from combat are deemed destroyed. In any other situation roll a D6 and then consult the table below to see what happens. Deduct −1 from the roll for each of the unit’s stands that has already been removed as a casualty and apply the result immediately.
| D6 | Result |
|---|---|
0 or less |
The unit/character leaves the battlefield and does not return. The unit/character is considered to have been destroyed. |
1–2 |
The unit/character leaves the battlefield and may or may not reappear. At the start of its side’s next turn, before initiative moves are made, roll again on this chart. |
3–4 |
The unit/character reappears at the table edge at the same point it left. The unit/character cannot move further that turn. |
5–6 |
The unit/character reappears at the same point on the table edge it left from. If it is reappearing at the beginning of a turn, it may move as normal. |
When a unit reappears on the table it must retain the same formation and face the same direction as when it left the table.
Characters who move off the table with units they have joined suffer the same fate as the unit. Characters who are on their own must roll in the unlikely event that they leave the table. If a General leaves the table (for whatever reason) and does not return immediately then the battle is over and his army withdraws. He abandons his army and heads for the hills and is considered to be a casualty. See the End of the Battle section.
Terrain
|
The Advanced Terrain rules in the rulebook extend the basic Terrain rules, they do not replace them. The two sections have been combined here. See the 2025 Questions and Answers. |
By terrain we mean woods, hills, rivers and other features that might conceivably be found on the battlefields. Many of these features hinder troops because they impose a Command penalty. In some cases, features can be impenetrable to one or more troop types. This can radically affect strategy, providing strong points to defend as well as obstructions to movement.
Terrain features are classified by characteristics such as accessibility and other effects they provide for the troops. The characteristics are described as follows:
- Passable terrain
-
Standard terrain that does not impede movement or provide any advantage to units crossing it.
Accessible to all troop types.
- Rough terrain
-
Challenging terrain that complicates movement and prevents the use of charge bonuses. While it hinders attackers, it does not provide a defensive advantage.
Accessible to Infantry, Monsters, and Cavalry. Charging units do not receive charge bonuses against enemy stands at least partially in Rough Terrain. Defenders are not considered defended.
- Difficult terrain
-
Treacherous terrain that is unsafe for large creatures or mounted units but provides infantry with defensive benefits.
Accessible only to Infantry. Infantry stands at least partially within Difficult terrain are considered defended.
- Broken terrain
-
Highly obstructed terrain that prevents units from forming proper ranks or moving at speed.
All units at least partially within Broken terrain are in Irregular Formation.
- Terrain difficile
-
non-open terrain hindering orientation and complicating commanding.
Units at least partially in the Dense Terrain subtract −1 to the Command value when being ordered.
- Impassable terrain
-
While individuals may traverse this terrain, it is impossible for organised units to move through.
No units may enter Impassable terrain. Mountless or flying characters and flying units may pass through (or over) as long as they do not end their movement inside it.
- 2cm visibility terrain
-
When within woods, forest or villages, troops cannot draw a line of sight except that stands placed within 2cm of the edge can see out, and can be seen by troops outside.
By the same token, troops further inside the woods, forest or village can see and be seen by other troops up to 2cm away.
Types of terrain
- Hills and slopes
-
Passable terrain. Blocks line of sight. Infantry and artillery stands positioned on a hill are defended against any units charging or shooting from lower positions. Artillery units on hills can shoot over friendly units at lower elevation.
- Shallow rivers or streams
-
Rough, Dense and Broken terrain. Units charging from within or across a stream do not receive a charge bonus. Units that have crossed a stream suffer a −1 penalty to subsequent orders in the same Command phase.
- Loose terrain, soft sand and fields
-
Rough terrain.
- Marsh or dunes
-
Rough and Dense terrain.
- Woods and tall scrub
-
Difficult and Dense terrain. There is only 2cm visibility in this type of terrain.
- Villages, towns, and other built-up areas
-
Passable, Dense and Broken terrain. Infantry and artillery units count as defended when within. All unit types can be pursued when starting their retreat in this terrain type. Villages and towns have visibility of 2cm.
Model-wise they are a bordered area consisting of a number of buildings. The entire built-up area is considered to be a broad terrain type: no account is taken of individual buildings, gardens, and so forth.
- Individual buildings, terrain features, sheer cliffs or mountains
-
These are Impassable terrain that blocks line of sight.
- Rivers, lakes, lava, ravines, deep water or deep pits
-
These are Impassable terrain that does not block line of sight.
- Roads and tracks
-
Passable terrain. A non-flying unit that moves its maximum movement distance in a column formation along the road can make an extra half-pace move and gains a +1 Command bones for a following order in this Command phase. However, this movement must not result in contact with the enemy.
For a brigade to benefit from this rule, it must be at most 4cm wide (e.g. a one-stand-wide infantry column or two side-by-side cavalry columns).
- Bridges and fords
-
Passable terrain. Bridges and fords don’t block line of sight. Bridges and fords that connect to a road or track are part of it and all bonuses apply.
- Low linear obstacles
-
Impassable for Chariots, Artillery and Machines. These are features such as ditches, hedges, fences, and low walls. Infantry and artillery stands placed behind a low linear obstacle count as defended. Low linear obstacles don’t block line of sight.
- High linear obstacles, fortress walls
-
These are described in detail in the chapter Siege & Fortresses.
Units forced into impenetrable terrain
The rules occasionally oblige units to move into terrain they cannot enter. Stands are not permitted to move so that their bases intersect with terrain that is impassable to them – either wholly or partially. Stands will automatically halt at the edge of terrain they cannot enter.
If they are driven back into impassable terrain as a result of shooting or magic, units may become confused (see the Shooting Phase section and the Confusion section). If a unit is forced to retreat into impassable terrain during combat, then stands may be destroyed as a result (see Combat phase – Retreats).
|
The Q&A has a section on Movement with further examples. |