Combat Phase
In the Combat phase, work out the fighting for each combat engagement. You must work out the result for each engagement before going on to the next. Work out each in the following combat sequence.
Combat represents close quarter fighting between enemies whether it is continuous hand-to-hand combat, very short-range missile fire or a combination of both. In some cases we might imagine units clashing repeatedly for brief periods which are punctuated by momentary pauses in which the combatants gather their energy. This is especially likely when fighting over broken ground such as woods or amongst ruins or when troops are assaulting fortifications. In any case, all close quarter fighting is represented by means of the rules in this section.
Combat engagement
Units can move into contact with enemy units during their Command phase either by means of an order or by using their initiative. Units using their initiative must always move against the nearest enemy they can see. Units acting on an order can move against any enemy within reach and which they can see. In both cases, the move is referred to as a charge. Once units are touching an enemy unit they are said to be engaged in combat.
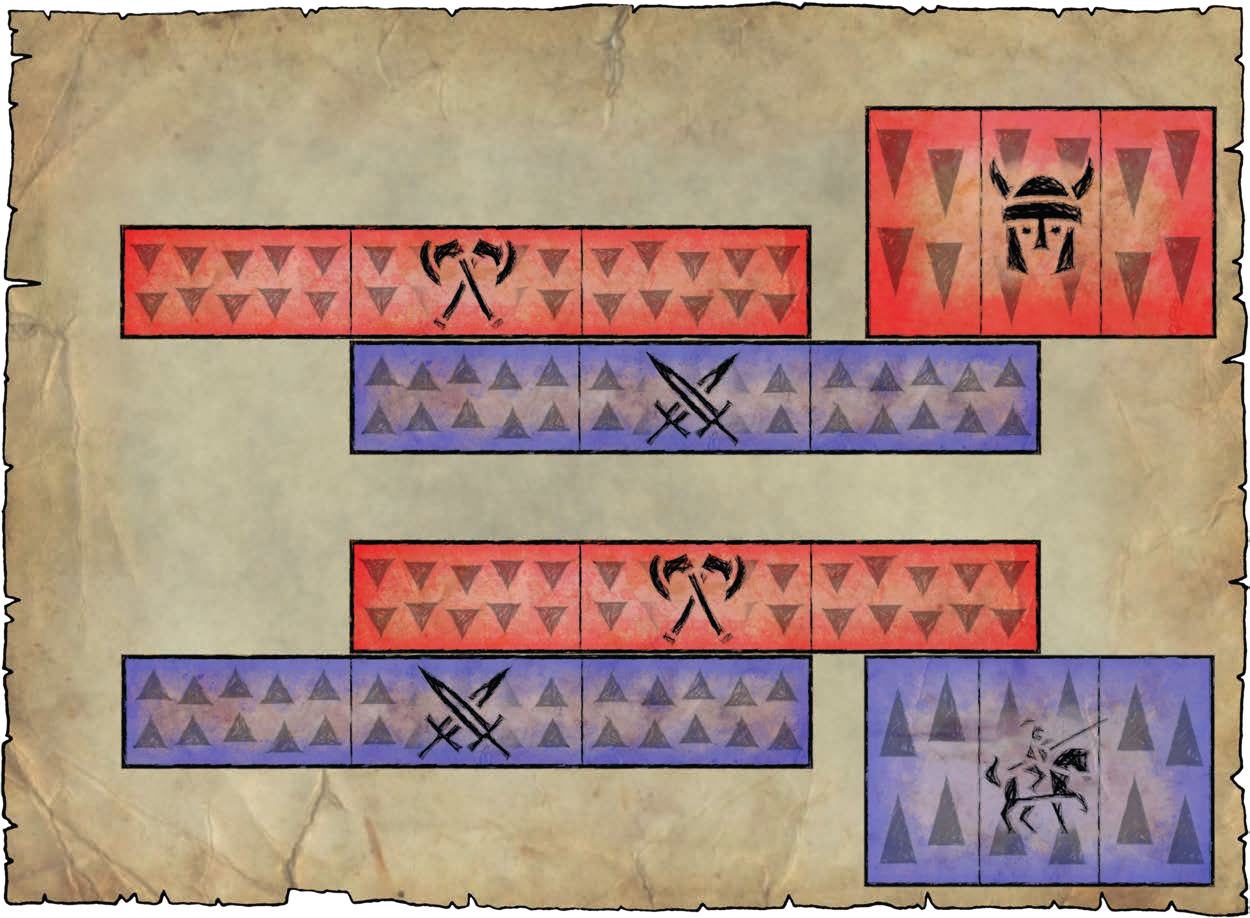
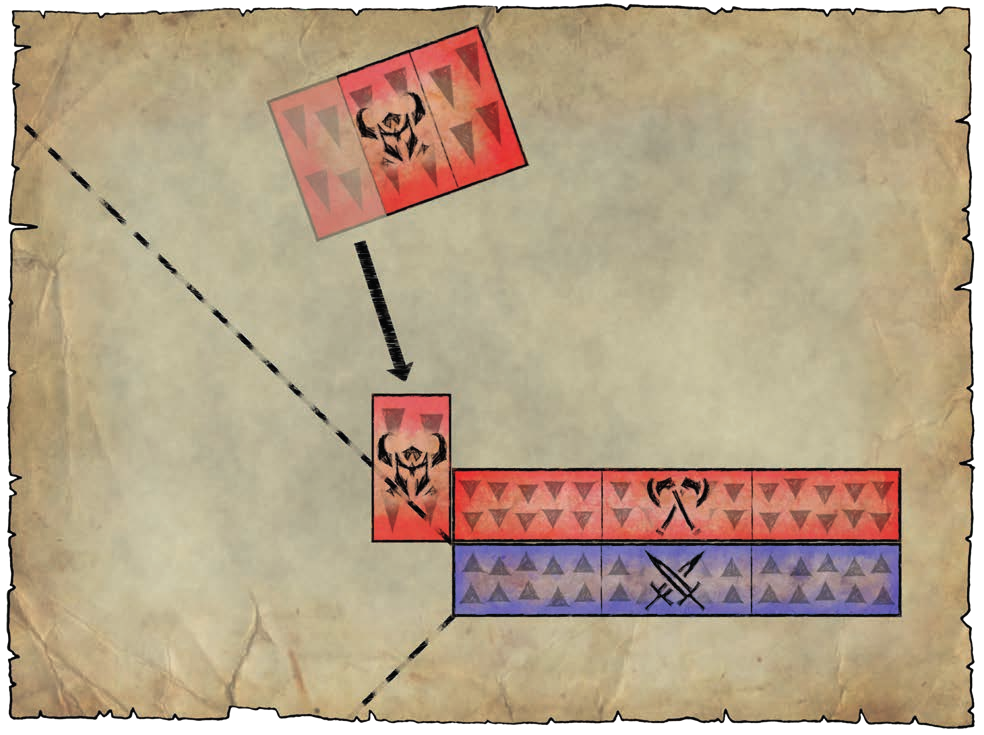
Once units have engaged in combat they might typically be arranged as shown in Figure 1.

A combat engagement can sometimes involve several units on one or both sides. All interlinked units are considered to be fighting in the same engagement. See Figure 2.
Moving chargers
The rules for moving chargers may look a bit intimidating at first but do not worry! Almost all moves happen in an obvious way. Many of the following rules are intended to overcome any unusual circumstances you might come across where care may be needed.
Sequence of charges
The term ‘charge’ describes a unit’s movement into contact with an enemy unit during the Command phase whether by initiative or by means of an order. Units which move by initiative are moved before units which move by orders but, apart from this, there is no obligation to move charging units in any particular order. Charges occur throughout the Command phase as units move against enemy units. Where a charge is intended, the player must say so before any stands are moved as this alerts both players to the need for care. A unit is not obliged to charge just because the player has stated it – the move may prove impossible or player might simply change his mind for any reason.
Enemy in sight
At least one stand from the charging unit must be able to see the target enemy unit at the start of the unit’s charge move. If none of a unit’s stands can see the intended target then it cannot charge it. Note that because units move one after the other it is possible for one unit’s move to clear or block the line of sight for another; it is therefore important to take care when deciding which units to move and in what sequence.
A stand can ‘see’ if it is able to draw an uninterrupted line of sight from its front edge to any part of the enemy unit as described in the Shooting section. All intervening stands, friend or foe, block a stand’s line of sight. All intervening terrain also blocks the line of sight with the exception of low obstacles, rivers/streams, marshes, and similarly low features. Character stands never block a unit’s line of sight, as explained in the Generals, Wizards and Heroes section.
Zones
For purposes of working out where to position units during a charge, the area around each stand is divided into four zones as shown on the accompanying diagrams. The division between each zone bisect the corners of the stand at the angle of 135 degrees relative to the edge. Zones are self evident in most situations and can be checked using a simple guide if necessary. See Figure 3 and Figure 4.


Once a unit’s intention to charge has been declared, begin by considering the position of the entire charging unit relative to the closest visible stand in the target unit. If the charging unit begins its move in the stand’s front zone then it charges to the front, if it begins to the stand’s flank it charges in the side, and if it begins to the rear it charges in the rear. See Figure 5.
If the charging unit is not entirely within a single zone then it counts as being in the zone that it mostly occupies. So, if a unit is between the front and flank but the greater proportion is to the front, the unit counts as in the front. If a unit is positioned in such a way that it is exactly divided between two zones then roll a dice to decide – e.g. 1, 2, or 3 the front; 4, 5, or 6 the side. See Figure 6.

The charge move
In most situations it is a simple matter to position the charging unit against the indicated front, side, or rear edge of the enemy unit. In some cases extra care is called for. Players who are unfamiliar with the game should make a point of moving the stands one at a time, as described below, until they are used to the placement rules.
To begin, the charging player selects one stand from the charging unit. Any stand may be chosen – it does not have to be the closest. This stand must be able to see the enemy and must have a clear path to the target. The selected charging stand is moved into place against the enemy stand that has already been identified as the closest visible stand to the charging unit.
Move the charging stand so that its front edge contacts the appropriate edge of the enemy stand. If the unit is charging from the front zone, place the charger against the enemy stand’s front edge.


When placing the first charging stand, position it exactly centre-to-centre against the indicated edge of the target stand. If this is impossible because of interposing stands or scenery then place the charger as closely as possible to the centre of the target stand. There must be at least 1cm of clear base edge on the target stand to place the first charging stand otherwise the move is not allowed (see Blocked Edges).

Forming a battle line
Once the first charging stand has been positioned, the remaining stands are placed one at a time to make a line formation or ‘battle line’. Each stand must be able to trace a line to its new position as it moves. Note that it doesn’t matter what formation the unit is in when it begins its charge, charging units always form a battle line if they can do so.

Stands are placed into a coherent formation as they move. Place a second stand beside the first, and place the third stand beside either the first or second. You cannot leave a gap in the battle line and then fill it later. The reason for breaking down movement by individual stands is to make sure each stand has an accessible route to its final place in the battle line.

Each stand must be placed in the battle line in such a way that as much of its front edge as possible makes contact with the enemy. This is called ‘maximising frontage’. If it is impossible to place a stand into the battle line so that its front edge makes contact with an enemy, then it must be placed so that its front corner touches an enemy if it can. This means that the maximum number of charging stands will be drawn into the combat.
Contact with other enemy
If there are other enemy units adjacent to the target unit then the obligation to ‘maximise frontage’ extends to these other units too. So, where there is another enemy stand aligned to the target unit, a charging stand must be placed against this second enemy if this is its only way to maximise frontage. However, chargers will always maximise frontage against the unit they originally charged where they can do so.
Any additional units contacted by charging stands count as being charged and are drawn into the combat engagement – even if they are only touching corner-to- corner. If armed with appropriate weapons they can shoot at the chargers as described in the Shooting section.
Exceptions & Anomalies
In some situations the proximity of scenery or other stands makes it impossible to position all the chargers exactly as described. In some cases this may mean the charge is not permitted, in others that chargers can be repositioned to accommodate the situation. These circumstances are covered in the following rules sections.
Unable to contact centre-to-centre
The first charging stand is always positioned centre-to centre with the closest enemy stand where possible. If this is not possible then the first charging stand is positioned as closely to centre-to-centre as it can go, but there must be at least 1 full cm of exposed stand edge to contact against.
If there is less than 1 cm of exposed edge then the stand is not an eligible target because it is ‘blocked’. See below for how to deal with blocked stands.

Unable to form a battle line
If a stand has insufficient room or insufficient move distance to form a straight battle line, it must be placed either directly behind, or beside and staggered back from a stand that has already moved. Stands placed behind must be positioned facing the same direction as the stand in front of them. Stands that are staggered back can be placed with as much or as little of their stands touching as the player wishes, but must contact with a fellow stand at least corner to corner. Either way the unit must retain a coherent formation with all stands touching. If a unit is unable to both charge and retain a coherent formation then the move is not allowed. See Figure 7.
Any additional enemy units contacted as a result of the placement of these stands also count as being charged and are drawn into the combat engagement – even if chargers are only touching at their side or rear edge. If armed with appropriate shooting weapons they are entitled to shoot at the charging unit as described in the Shooting section.

Blocked edges
In some situations a charging unit will be unable to charge because, although it can see the enemy unit, the indicated edge of the closest stand is blocked. The indicated edge could conceivably be blocked by impassable terrain, by other enemy stands, or by stands from other friendly units that have already engaged the enemy unit in combat. Remember, an edge is blocked not only if it is completely covered, but also if there is less than 1cm of exposed edge available to contact.
In all these situations the charger moves the charging stand against the next closest stand in the target unit, assuming this stand is an accessible visible stand within the same zone. If this stand edge is also blocked then the charger can move to the third closest stand, and so on.

If no accessible edge is presented by any stand in the target unit then the charge is not normally allowed – for example, if there is impassable terrain covering the unit’s front edge and the charger is positioned in the target’s front zone. The exception to this is a ‘pinned’ enemy unit as described below.
Pinned targets
If the indicated edge of the entire enemy target unit has already been covered by stands from other friendly units then the unit is described as ‘pinned’. In the case of a pinned target, the first charging unit can move into corner-to-corner contact with the closest enemy stand assuming the charger can see it and has a clear path. This is an exception to the normal rule that stands must charge edge-to-edge. See Figure 8.
Irregular formations
If the target unit is in irregular formation then it might not be possible for all the charging stands to engage by forming a conventional battle line. In this case the first charging stand is placed in the standard way as already described. It is only the remaining chargers that are placed differently.
Remaining charging stands are placed in a line but staggered to the front or rear so that they follow the shape of the stands presented by the enemy unit.
Although these charging stands might touch the enemy only at a corner or along part of their front edge, they are considered to be maximising frontage so long as they have the maximum portion of enemy stand directly to their front.

Enveloping charge
The ‘envelop’ rule applies when a unit is charged in the side – it represents a unit’s inability to turn enough troops quickly enough to avoid being enveloped by an enemy charge. The reason for this rule is to avoid situations where it is otherwise disadvantageous to charge a unit in the side because only a single stand can touch.
When a unit charges an enemy unit from the flank and contacts only against the side of an enemy stand or stands, then any charging stands that would not otherwise touch the enemy when forming a battle line are allowed to make a further move into contact with the charged enemy unit as described for a pursuit. Stands must have sufficient move distance remaining from their charge move to make the envelopment move.
This is called an ‘enveloping charge’ and it is entirely up to the charger whether to envelop or form a conventional battle line. Each stand enveloping in this way must move so that its front corner contacts the charged enemy unit, otherwise these stands can be positioned as the player wishes so long as they remain in formation. Enveloping stands can contact other enemy units and therefore bring them into the combat, but they must also contact the charged unit either to their front edge or front corner as described. Note that this is comparable to a normal pursuit move in most respects – the enveloping charge effectively combines a charge and pursuit into a single move.
If chargers are infantry with supporting chargers then move both the charging and supporting units and work out any shooting first. Supporting units remain in their battle line and do not envelope.

Attacks
Regardless of whose turn it is, all units which are engaged in combat can fight in the Combat phase. Work out one engagement at a time. The player whose turn it is nominates which engagements to fight first.
If at the end of an engagement a victorious unit advances into another engagement or initiates a new engagement by advancing into a fresh enemy then work out that engagement next and include the advancing unit amongst those fighting (see Advance).
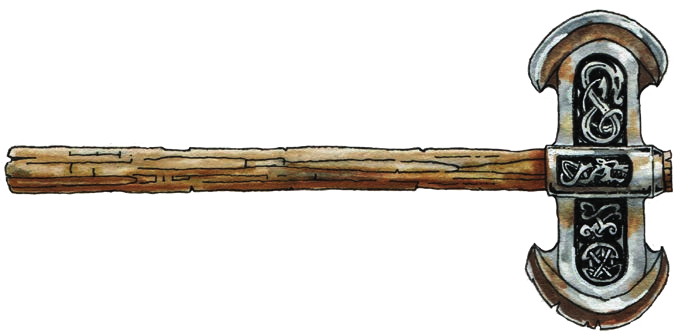
Attack value
All stands have an Attack value which determines how effective they are in combat. The higher the value, the better combatants fight. Some troops have two values separated by a slash. The first is used for close combat and the second for shooting.

| Attacks | |
|---|---|
3/1 |
|
↙ |
↘ |
Close Combat Attack value |
Shooting Attack value |
Work out the attacks of one unit at a time. It is usual for the player whose turn it is to complete his attacks before his opponent as this ‘feels right’, especially where units charge dramatically into combat! Strictly speaking, it makes no difference who goes first as stands which fall casualty are allowed to fight back before they are removed.

Every stand touching an enemy stand can fight – even if it is only touching corner-to-corner or at a side or rear edge. Hits inflicted are always accumulated against the target unit as a whole and not against individual stands.
Each stand must direct all of its attacks against a single enemy unit – it is not permitted to divide a stand’s attack between two different enemy units. Where a stand can potentially attack one of two or more enemy units, the player must declare where all of the unit’s stands are attacking before rolling dice – this prevents combats becoming bogged down into stand-by-stand dice rolls.
Stands strike against enemy units as dictated by the following list of priorities:
-
A stand will always strike against an enemy unit touching its own front edge if possible. If a stand is touching more than one enemy unit to its front, the player can decide which to attack.
-
If a stand is not touching the enemy to its front, then it must direct its attacks against an enemy unit to its side or rear edge if possible. If a stand is touching more than one enemy unit to its side and/or rear edges, the player can decide which to attack.
-
If a stand is only touching an enemy corner-to-corner then it can direct its attacks against any unit it is touching. Note that where a stand’s edge is touching an enemy, it cannot direct attacks corner-to-corner: corner-to-corner attacks are not allowed where there is edge contact.
Attack modifiers
The Attack value of a stand is modified by tactical factors as shown below. These represent different tactical situations by means of bonuses or penalties.
Charging against enemy in the open |
+1 |
Monster/chariot charging enemy in the open |
+1 |
Pursuit attack |
+1 |
Extra pursuit attack (per 3cm) |
+1 |
Fighting terrifying enemy |
−1 |
Enemy facing own side or rear |
−1 |
Confused |
−1 |
Charging against enemy in the open
This bonus applies to all stands where a unit charges into combat. The bonus only applies in the first combat round of an engagement. The bonus does not apply if the enemy are not in the open, e.g., when a stand is fighting against infantry or artillery in a defended or fortified position as described later.
Monster/chariot charging
This bonus is applied to Monster and Chariot stands charging in addition to the basic charging bonus. This means that Monsters and Chariots receive a total bonus of +2 when charging against enemy stands in the open.
Pursuit attack
This bonus applies to stands from pursuing units that won the previous round of combat and are attacking enemy units that retreated from the same engagement. Pursuit bonuses only apply in subsequent rounds of combat, including the first round of unresolved combats fought in the previous turn.
Pursuit attack per full 3cm
This bonus applies to stands whose units pursue enemies that have retreated by 3cm or more in the previous round of the same engagement. The bonus is added to the standard pursuit bonus. Each full 3cm that the enemy retreats adds a further +1. So a unit which forces its enemy to retreat 6cm gets a +1 pursuit bonus plus a further +1 for each full 3cm, making +3 in total.
Fighting terrifying enemy
This penalty applies to all individual stands which are touching at least one stand of terrifying enemy. Terrifying enemy include especially scary creatures such as massive Dragons. The penalty doesn’t apply to units which are terrifying themselves… you can’t terrify a terrifying creature! Creatures which terrorise their foes are indicated in the Army List section.
Enemy facing own side or rear
This penalty applies to individual stands which have an enemy stand’s front edge or front corner touching their own side edge, rear edge or rear corner. Note that only enemy front edges and corners impose this penalty. Opposing stands touching side to side don’t impose a mutual penalty for example.
Confused
This penalty applies to all stands in a confused unit. Units can become confused as a result of missile fire or by moving into other friendly units or impassable terrain. See the section on Confusion.
The Last Ditch Dice
Attack modifiers can potentially reduce a stand’s Attack to zero. If this happens, then a unit always rolls one Attack dice regardless.
How to calculate damage
To work out the damage inflicted by a unit in combat, begin by adding up the total Attack value of its fighting stands. For example, a unit of three stands each with an Attack value of 3 has a total value of 9.
The total Attack value is the number of dice rolled to determine how many hits are scored on the enemy. The minimum dice roll required for a hit is normally four. So, eight dice rolls of 1, 2, 2, 3, 4, 4, 6 and 6 equal four hits on the enemy.
If enemies are in defended or fortified positions, the roll needed to hit will be 5+ and 6 respectively. See Defended & fortified troops.
Armour
As already described for shooting, if a unit has armour then the number of hits scored by the enemy might be reduced. A unit’s Armour value is expressed as a number: 6+, 5+, 4+ or 3+. This indicates the minimum dice score needed to nullify a hit. Roll one dice for each hit scored on the unit. Any dice that rolls equal to or more than the Armour value of the unit will nullify or ‘save’ one hit. Hits nullified in this way are ignored – they are not struck on the target and no further account is taken of them.
Casualties
A stand can take a number of hits before it is destroyed, as described in the Shooting phase section. This varies depending upon how tough and determined the unit is. Men have a value of 3, for example, whilst Dwarfs, an infuriatingly hardy folk, have a value of 4.
Record hits suffered by each unit during the combat round. Once the round is complete, units that have suffered hits equal to or greater than their Hits value must remove one or more stands as casualties. The player who lost the combat should remove his casualties first and then the winner. In the case of a draw roll a dice and the lowest score removes his casualties first. Stands are removed one at a time from the edge of the formation so that the formation is not broken at any time, but otherwise the player can choose which of his stands to remove. Stands that are not touching an enemy can be removed as casualties if the player wishes, in which case it is assumed that casualties occur at the front and warriors press forward to take their place.
Where a unit takes too few hits to destroy a stand or if it suffers enough to remove a stand with some remaining, record any outstanding hits. This is most easily done by placing a distinctively coloured dice directly behind the unit to show the number of hits it has taken. If combats involve several units on each side, it is advisable to use a notepad and paper to keep a record of casualties. Alternatively, you can devise suitable markers or simply remember, whatever you find the most convenient.
At the end of the Combat phase, odd hits are discounted from units that are no longer engaged. Hits are only recorded from one turn to the next for units that remain engaged in an unresoved combat at the end of the Combat phase. Discounting hits in this way can be thought of as units recovering their combat efficiency during lulls in the fighting.
Note that it is important to record hits through the Combat phase and only discount outstanding hits once all engagements are finished. This is because it is possible for units to become involved in a second engagement, for example as a result of an advance. In such a situation, any hits accumulated in a previous engagement are carried forward into the next.
Supporting troops
It is possible to affect combat results by using adjacent infantry stands to support fighting infantry units. This represents the ability of a unit to threaten the enemy’s flanks or to provide solidity through depth. Only infantry can support and be supported in this way.
A stand can only support if it is not touching an enemy and the unit it belongs to is not confused. The stand must be aligned either exactly behind or exactly beside a stand that fought to its front during the combat round. The supporting stand must also be facing in the same direction as the supported stand as shown in the accompanying diagrams. Note that a stand touched by enemy to its front and sides or rear during the combat round can be supported, but a stand touched by enemy only to its sides or rear cannot. A supporting stand can be from the same unit as the fighting stand it supports or from a completely different unit. See Figure 9.

For each supporting stand in the combat engagement add +1 to the combat result. For example, if a side inflicts five hits on the enemy and has three supports, its combat result is 8. Note that supports merely add to the result and not to the actual number of hits inflicted. Work out how many supporting stands each side has once all attacks have been struck but before removing causalities. Units benefit from support throughout a combat round even where causalities might remove supported or supporting stands.
Supporting Combat
Units are automatically included in any combat engagement where they support. This means they are affected by the combat result and the usual options apply. This is covered in the following sections under Retreats and Aftermath.
Sometimes, a unit finds it is supporting two different friendly units fighting what would otherwise be two separate combat engagements. Even in this case, there is only one combat engagement – not two. All the units are interlinked via the supporting unit.
Supporting Charges
During the Command phase, a unit is allowed to make a supporting charge if it is positioned behind another so that at least one stand could theoretically support in combat from the rear.
If the front unit charges, whether on initiative or by means of an order, then the second unit can automatically make a supporting charge. It can do so whether the first unit charges on initiative or with an order, even where the second unit was not included in a brigade order.
Note that the second unit might have more or fewer stands than the charging unit, or it could have some stands positioned to give rear support and some not. Regardless of how stands are positioned, only one unit can make a supporting charge on behalf of another. It is not possible to place two units so that they can both make supporting charges – in such a situation, the player must choose which unit will make the supporting charge.
The supporting charge is a normal move, except the unit making the supporting charge must be placed so that it touches the first unit and at least one stand supports it either from the rear or side. No stands can be placed into touch with enemies – neither into edge contact nor corner-to-corner contact.
The supporting charge is a special kind of combined move – the supporting unit’s move is rolled into that of the charging unit and is considered part of it. The charger can be thought of as carrying the supporting charger with the same order. If a unit is unable to move for whatever reason (if it is confused for example), or if it does not have sufficient move distance to move (if it is in irregular formation for example) then it cannot make a supporting charge. Also note, that after failing to receive its first order a unit cannot use its half pace move to join combat by moving into the supporting position.
Retreats
A unit that loses a combat round must retreat by the difference in the combat result in centimetres. For example, if one side scores four hits and the other side scores one, the losing unit retreats 3cm. Remember to add any support from both sides before calculating the result.
If several units are engaged on the losing side, then the retreat distance must be reduced to take into account the potentially huge difference in combat results. To work out the retreat distance, divide the difference in the combat result by the number of units on the losing side. Remember to include any supporting units and any units that have been destroyed if they fought that round. Round any fractions up to the nearest cm – the minimum possible retreat is therefore 1cm. For example if there are three units on the losing side and the difference is 6, the losing unit retreat by 2cm.
If two or more units are retreating from the same engagement then move the units one at a time. The retreating player can decide which order to move the units in.

A retreating unit moves away from the enemy without changing formation or the direction it is facing. It will normally be apparent where to move the unit to. In most cases, all enemy stands will be aligned solely against the unit’s front, side or rear and the retreating unit simply moves in the opposite direction.

The direction of the retreat may be less clear if the unit is fighting enemy from several directions at the same time. In this case, the unit retreats from the greatest number of touching enemy stands. If this is equal, the retreating player can nominate which of the possible directions it will retreat. For the purpose of calculating the retreat direction, enemy stands touching corner-to-corner count as touching the edge that is parallel to the enemy stand’s front.
If there are no enemy stands touching the unit due to removing causalities, retreat from the closest enemy that was part of the combat engagement.
In a few cases, a unit’s formation may be arranged so that the direction of the retreat is in doubt. In this case, identify the retreating stand touching the most enemy stands and work out the unit’s retreat relative to that. If all stands face the same number of enemy stands, the player can decide which to use.
If all of a unit is supporting another, e.g. if it is placed in a second line, then none of its stands are touching an enemy. In this case, the friendly supported unit/s determine the direction of retreat. Work out the direction of retreat for the fighting units and then move supporting units back in the same direction. This means fighting and supporting units will effectively move as one, although it will still be necessary to move the units one at a time to make sure that stands have a path to their final position.
Blocked retreats
A retreating stand is destroyed if its retreat move is blocked. A retreat is considered blocked if any part of the stand’s base is obliged to move through any of the following: enemy stands, stands of other friendly units that are engaged in combat (including friendly units that have already retreated from the same combat during that round), terrain that is impassable, and stands from unengaged friendly units that do not make way as noted above.
Stands that are destroyed are removed immediately without reducing the number of outstanding hits on their unit.

If unengaged friendly units lie in the way of a unit’s retreat then these can be moved. The unengaged unit is said to make way. It is up to the player whether the blocking unit makes way or not. Units which make way and retreating units forcing others to make way can become confused as a result. See the Confusion section for further rules for confused units and making way.
A stand’s retreat can potentially bring it into contact with an enemy stand without intersecting with it. For example a stand retreats 1cm into an enemy stand exactly 1cm away. In this case, the retreat is blocked if the enemy units is not part of the same combat engagement. If the enemy unit is part of the same combat engagement, the retreat is not blocked and the move is covered by the rules for incidental contacts described later.
Blocked retreats often occur where units are partially surrounded, for example fighting to the front and rear at the same time. Blocked retreats also become common in large engagements as friendly units often get in each other’s way.
In rare occasions a unit of three stands may be split when only the middle stand has blocked retreat. If such a unit is out of coherency at the end of the turn and no longer engaged in combat, one of the remaining stands is automatically destroyed. Owning player decides which one.
Retreating units and incidental contacts
A stand can potentially retreat into contact – but not intersect – an enemy stand from a unit taking part in the same combat engagement. This often happens when a stand is facing enemies to its front and side, because by retreating from one it must move across the front edge of another. In such a case the retreat is not blocked and the stand is not destroyed. What happens next will depend on what the winner decides to do.

Aftermath
A winning unit can stand, fall back, pursue, or in the case where all enemy units are destroyed, advance. Victorious units do not all have to do the same thing and in some cases it may be impossible for them to do so. The player deals with the victorious units one at a time in any order. It makes no difference whether individual units advance, pursue fall back or stand – the player can deal with them in any order.
Move victorious units after enemy units have retreated after the losing side has completed any necessary moves to make way and remove any stands whose retreat is blocked.
Pursuit
A unit which wins the first round of an engagement can pursue a retreating enemy and fight a second round. A unit that wins a second round of an engagement might also pursue, in which case the fight continues in the following turn.
Which units can pursue?
A victorious unit can pursue enemies retreating from the same combat engagement. However, pursuit is not allowed in the following circumstances:
Moving pursuers
Move pursuers one unit at a time starting with units that can see the retreating enemy. Where several units can pursue the same enemy, the victorious player can move them in whatever order he wants. The sequence can be important as one unit’s move can easily obstruct that of another either blocking line of sight or affecting the positioning of subsequent units.
If pursuing unit cannot see a retreating enemy unit (for example, because other pursuers have obscured their view), then pursuers cannot move into edge contact. Note that units unable to see an enemy may still be able to move into support as described under Supporting pursuits.
Occasionally, it will be impossible for a unit to pursue into edge contact even though it can see an enemy. For example, terrain or other units may block the unit’s path. In such a case, and only in such a case, a unit that can see an enemy is allowed to make a supporting pursuit instead (See Supporting pursuits).
Pursuing stands can move up to a normal full pace move to close the gap between themselves and either the enemy or the stand they are going to support.
All pursuing stands must be able to trace a clear path towards the enemy. Towards means just that – a pursuer’s path cannot take it away from the enemy and then back again by a circuitous route.
Basic pursuit
Choose a unit to make a pursuit move. Every stand that can move straight forward so that its front edge contacts an enemy stand must do so. This includes stands of enemy units that were in supporting position before causalities were removed. In many cases, the entire unit will move in this way. Once all of the unit’s stands that can move straight towards the enemy have done so, the unit’s remaining stands can be placed as the player wishes and can be placed into contact with the enemy or not, either as the player wants or as circumstance dictates.
The obligation to move stands straight ahead is waived where doing so would cause a unit to split its formation. This can happen where multiple enemy units retreat in different directions for example. In such cases, the player can choose which stands will pursue so as to avoid splitting the formation.
Note that the pursuing rules allow some stands to be arranged around the sides or rear edges of the enemy where there is room. This enables a victorious unit to lap around the enemy and maximise his attacks in the following round. Conversely, the rules also allow stands to be positioned to fight from a corner, to support, or to extend a unit’s position to meet a charge in a subsequent turn.

Indirect pursuit
Occasionally, you will find that no stands can pursue by moving straight ahead even though the unit can see a retreating enemy. In this case, a unit can pursue as long as at least one stand has a clear path towards the enemy.
Take any one pursuing stand that can see the retreating enemy. Move the stand into contact with the closest visible enemy stand exactly as you would during a charge. Having placed the first stand, remaining stands are positioned as the player wishes, as already described for basic pursuits.

Supporting pursuits
A unit that cannot see a retreating enemy cannot pursue into edge contact. Such a unit might still be able to pursue in order to support a fighting friend. As only infantry can support and be supported, it follows that only infantry are able to pursue in this way. This is called supporting pursuit.
A unit can also make a supporting pursuit if it can see a retreating enemy but it is impossible to pursue into edge contact for whatever reason. Units able to pursue into contact cannot choose to make a supporting pursuit instead.

To make a supporting pursuit at least one stand must be moved straight ahead so that it is directly behind or directly beside a fighting infantry stand from a different unit. Note that this might coincidentally bring the stand into corner-tocorner contact with enemy, in which case the stand can fight in the following round. If it is impossible for at least one stand to move as described then the unit cannot pursue.
When one stand has been moved into position as described, the unit’s remaining stands can be moved into formation. These stands can be positioned as the player wishes so long as they are not placed into edge contact with any enemy stands.
Note that although supporting pursuer cannot be placed into edge contact with enemies, they can be positioned into corner-to-corner contact. Often this is the inevitable result of stands moving into what would otherwise be supporting position.
Incidental contact
When moving a pursuer into contact with retreating enemies, it is possible for stands to come into contact with enemy units that were not previously engaged in the same combat. This is called incidental contact.

Incidental contact is sometimes unavoidable. It will depend on the order in which pursuers are moved and, in some cases, how a player chooses to position pursuing stands. However, units making a supporting pursuit are not permitted to contact any enemy stands edge-to- edge, not even as incidental contacts. See Supporting Pursuits. Any opposing units touching once pursuits are complete are automatically drawn into the engagement. It is important to remember that pursuit bonuses apply only against enemy units that fought in and retreated from the same combat engagement as the pursuer in the previous round. No pursuit or charge bonuses apply against newly engaged enemy units.
In case of incidental contact with an enemy unit that is part of another engagement the situation depends on whether that engagement was already fought or not. If the engagement was already fought and was therefore left unresolved, the retreating and pursuing units become part of that unresolved combat and no other rounds are fought. If the engagement hasn’t been fought yet, it becomes part of the actual combat. However, the newly engaged units can fight at most one round of combat alongside the pursuing and retreating units. If the incidental contact occurs as a result of a second round of combat, the newly engaged units do not get to fight in this combat phase.
Infantry contact with cavalry
It can sometimes happen that infantry maintain contact with retreating cavalry or chariots. This can occur where infantry pursue enemy infantry and end up in corner-to- corner or side-to-side edge contact with enemy cavalry or chariots that have retreated alongside them. Contact can also be maintained where a unit is obliged to retreat at a right angle along an enemy infantry formation. In all these cases, retreating units that remain in contact with their enemy also remain engaged for the following round regardless of rules that normally forbid pursuit. Where attacks are struck against retreating cavalry/chariots the usual pursuit bonuses apply. Same principle applies on non-flying units pursuing flyers.

Impossible to pursue
It can happen that it is impossible for a unit to pursue – for example because no stands can be moved into front edge contact or into supporting positions. Such a situation sometimes occurs where other units have already pursued a retreating enemy and blocked line of sight, for example. A unit that cannot pursue a retreating enemy must either stand or fall back. The unit is not allowed to advance instead.

Pursuit and destroyed enemy
A unit is destroyed once all of its stands have been removed as casualties. At the end of a combat round, it is possible that all the units engaged on one side will have been entirely destroyed. In such a case the victorious units can advance. Pursuit is not possible because there are no retreating enemies to pursue against. See Advance.
Pursuit and Combat Dropouts
It can happen that several units retreat on one side but pursuers move in such a way that one or more retreating units are no longer engaged in the combat. A unit remains engaged whilst it is either touching an enemy, or supporting stands that are touching an enemy, but it is quite possible for retreating units to find they are no longer in combat at all. Such units simply drop out of the combat engagement like any other units that have not been pursued. It is possible for such units to be contacted by pursuers during subsequent rounds of combat, in which case they are treated as new incidental contacts. See Incidental Contacts.
Pursuit in Terrain
Visibility within woods (and other features described in Advanced Terrain Rules on p80) is restricted to 2cm for most purposes, but in the case of combatants we make an exception. If units are fighting inside a wood (or other features with restricted visibility) then potential pursuers are assumed to be able to see units that have retreated from the same combat. This represents the fact that combatants would actually move together without one side necessarily losing sight of the other as they retreat.
Advance
If all the enemy units in a combat engagement are destroyed, a victorious unit can do one of three things: it can stand its ground, fall back, or advance.
Note that in a combat engagement with multiple units on both sides, all enemy units have to be destroyed for an advance to be able to happen. When friendly units fighting together in single combat get separated by the removal of stands, they still count as being in the same combat engagement until the end of the current Combat Phase.
A unit is only allowed to advance once in a Combat phase even if its enemies are destroyed a second time.
Units can’t advance through terrain they can’t enter, if they are in fortified positions, if there is no path to enable them to do so, if the unit is artillery, or if they have already advanced in that Combat phase. Otherwise, units are allowed to advance against any kind of enemy, even if they are a troop type that would not normally be allowed to pursue, such as infantry fighting cavalry or chariots.
An advance is essentially a new charge move of 20cm. An advancing unit can charge the closest enemy unit that it can see and which it can reach. The unit cannot charge any other enemy unit and if there is no visible enemy within reach the unit cannot advance. This is comparable to a charge move made on initiative in the Command phase.
The advancing unit’s move is worked out in the same way as a charge except that no stand may move further than 20cm regardless of its usual move rate or formation. This also applies on the supporting unit.

Although the move is essentially the same as a charge, no charge bonus of any kind applies to advances: this takes into account a measure of exhaustion resulting from prolonged combat.
An advance might initiate a new combat engagement, it might bring the advancing unit into an existing unfought engagement, or it might bring the advancing unit into an engagement that has been fought but which remains unresolved.
If advancing into an engagement that has already been fought that turn (an unresolved combat), the advancing unit will fight in the Combat phase of the following turn.
If advancing into an existing unfought engagement or a new combat engagement, the advancing unit fights as part of the engagement that turn. This means the unit fights in two separate engagements during the same Combat phase and could, potentially, fight up to four rounds of combat during the turn.
An enemy unit that has been advanced upon can shoot at the advancing unit in exactly the same way as a unit shooting at chargers in the Command phase.
Any hits already accumulated against the advancing unit from its first engagement are carried over into the new combat engagement.
Fall backs
In a drawn combat both sides must fall back unless one side is in a defended or fortified position in which case it can stand instead. A victorious unit can choose to fall back if the player wishes. The opportunity to fall back gives players a chance to pull units out of combat and move them to better tactical positions.
If both players have units falling back from a drawn combat each side takes it in turn to select and move one unit – roll a dice to determine which side goes first. 1, 2, 3 one side, 4, 5, 6 the other.
A fall back is basically a free move that represents the unit rallying back on its standards and officers. This move is made in the same way as a move by order except that the maximum distance is determined randomly and the direction must be ‘back’ as defined below.
The maximum distance a unit falls back is established by rolling three dice and adding the scores together. So, on a roll of 6, 4, and 3, a unit can fall back up to 13cm. There is no minimum distance – a unit that has elected to fall back does not to have to move at all so long as it is at least 1cm from enemy units and from any units engaged in combat as described below.
Where several friendly units fall back out of the same combat at the same time, one roll is made for them all. The same maximum distance applies to all, but units do not all have to move the same actual distance.
Stands that are falling back are allowed to momentarily contact the enemy stands belonging to units touching their own unit during the combat round. This allows stands to ‘slide’ out of position as they fall back – often this will be unavoidable. Stands cannot contact enemy stands from units they were not touching during the combat round.
Stands that fall back must end their move at least 1cm from any enemy units and from any units that are engaged in combat whether friends or foes. If it is impossible to move all the stands so they are at least 1cm from enemy or engaged friends, then the unit is automatically confused. See Confusion.
Occasionally, opposing stands are still touching at the end of the Combat round once both sides have fallen back. If this happens, units remain engaged in combat and will fight in the following round. Units that fall back but fail to break contact are automatically confused by dint of being within 1cm of enemy.
Moving back
When a unit falls back, the player selects any one stand from the unit and moves it back. In this case, ‘back’ is defined as behind the line drawn across the line of contact with the enemy units. See Figure 10 and Figure 11. Other stands can then be moved into formation as convenient so long as they do not exceed their permitted move. They can be positioned forward of the line established for the first stand if desired. Note that the unit does not necessarily fall back towards its own base edge or its own friends – the ‘back’ position is worked out relative to the first stand moved.


Unresolved combats
If after two rounds of combat both sides are still engaged then the combat is unresolved. All units remain in position and fighting resumes in the Combat phase of the following turn. This is quite common and happens where a second round results in one unit retreating and the victors elect to pursue.
It is important to remember where pursuit bonuses apply from the final round of the previous Combat phase. These bonuses will apply in the first round of the following Combat phase to those pursuers who are fighting retreating enemy. It is a good idea to make a separate note or use some kind of marker to remind players which bonuses apply to which combatants.
Remove odd hits
Once all combat engagements have been fought, remove any odd hits remaining on units that are no longer engaged in combat. Note that units that are part of an unresolved combat do not remove odd hits but carry them over into the following turn. This includes any units that are only supporting.
Defended & fortified troops
Only infantry, flying troops, and giants can move into base contact with fortified enemy stands at any time – for example by charging, during a pursuit, or as a result of an advance. Where other stands would accidentally contact a fortified enemy – for example by charging an adjacent unfortified unit these stands must be repositioned so that they no longer contact a fortified enemy stand. Note that this overrides the normal obligation to maximise edge contact against enemy units where this applies. Any position that brings troop stands, other than those indicated, into contact with fortified enemy is simply ineligible. If circumstance dictates that such a stand is unable to be positioned out of contact with fortified enemy then it is destroyed and does not fight.
Infantry and artillery units, however, can take advantages of natural vegetation, the lie of the land, fieldworks or permanent fortifications in order to make their position much more secure. This allows infantry and artillery stands to be either defended or fortified. In both cases the score required to hit will increase as shown on the chart below.
| Target | D6 result required |
|---|---|
Fortified infantry/artillery |
6+ |
Defended infantry/artillery |
5+ |
All other targets/circumstances |
4+ |
Defended
A stand is defended if it is placed wholly or partially; behind a low obstacle, such as a hedge or wall; at the edge of or within a wood; or amongst ruins or buildings. A stand is also defended if it is positioned on the crest or upper slope of a hill or rise so that it occupies higher ground than the charger at any point of the charge move. These are all judged to be situations that confer an advantage to infantry or to small units of artillery (even against flying units). Such units can position themselves closely to the lie of the land, taking advantage of minor folds in the ground, local vegetation, or barriers such as hedges or ditches. This advantage is partly due to a unit’s ability to entrench itself, for individual warriors to find cover, or for whole units to conceal themselves –for example by kneeling amongst dense undergrowth. Similarly, it confers an advantage to a unit that has taken up a position that is hard or exhausting for an enemy to approach.
Note that a unit can gain the defended status only when charged from the direction it can get advantage of the terrain feature, e.g. from the other side of the fence or up the hill slope.
Fortified
A stand is fortified if it is placed on the ramparts of a substantial fortification such as a castle wall, tower, fort or a large permanent earthwork.
These situations do not regularly occur in field battles but are included here for the sake of completeness. A well prepared field fortification might be considered to be a fortified rather than defended position – but only if it is constructed and positioned in such a way that troops must resort to climbing or scrambling up a steep slope in order to attack.
Defended & fortified enemy
Only infantry, flying troops, and giants can move into base contact with fortified enemy stands at any time – for example by charging, during a pursuit, or as a result of an advance. Cavalry, chariots, artillery and non- flying monsters and machines cannot do so. In the case of castle walls, towers and similarly tall fortifications, specialist equipment may be needed to mount an assault as described in the chapter Siege & Fortresses.
Defended or fortified stands are harder to hit as described above. Hence a score of 5+ or 6 respectively is needed to inflict hits. Also, charge bonuses don’t count against them because they are not ‘in the open’. The most common occurrences of this during a game are situations where infantry are on the upper slopes of hills or at the edge of a wood.
Cavalry, chariots, machine and monster stands never count as being defended or fortified, even when they have moved onto hills, behind hedges, low walls and so forth. In these situations, cavalry and chariots are assumed to have to move in order to fight, surrendering any advantage of shelter in favour of greater mobility.
Monsters and machines are simply too big or too dimwitted to take advantage of cover.
Troops that charge or advance are always assumed to be in the open, such as infantry stands charging in a wood. Troops that pursue a retreating enemy are also assumed to be in the open. In both cases, troops cannot take advantage of cover whilst pressing their attack. Troops that retreat in one combat round always count as being in the open during following rounds of pursuit combat. In most cases, this is obvious because enemy will have been pushed over a low wall or rampart. In other cases, a unit may be still inside a wood or still up-slope of an enemy. However, a unit always loses the advantage of its position once it has retreated.